

How to Make a Burlap Wreath: A Step-by-Step Guide for Any Season
Making a burlap wreath takes about 30 minutes and requires no sewing, no gluing, and no prior craft experience. The technique is the same whether you're decorating for fall, the holidays, or everyday — swap the embellishments and the wreath works year-round. This guide walks you through choosing the right burlap fabric, calculating how much you need, and building a full, even wreath from start to finish.
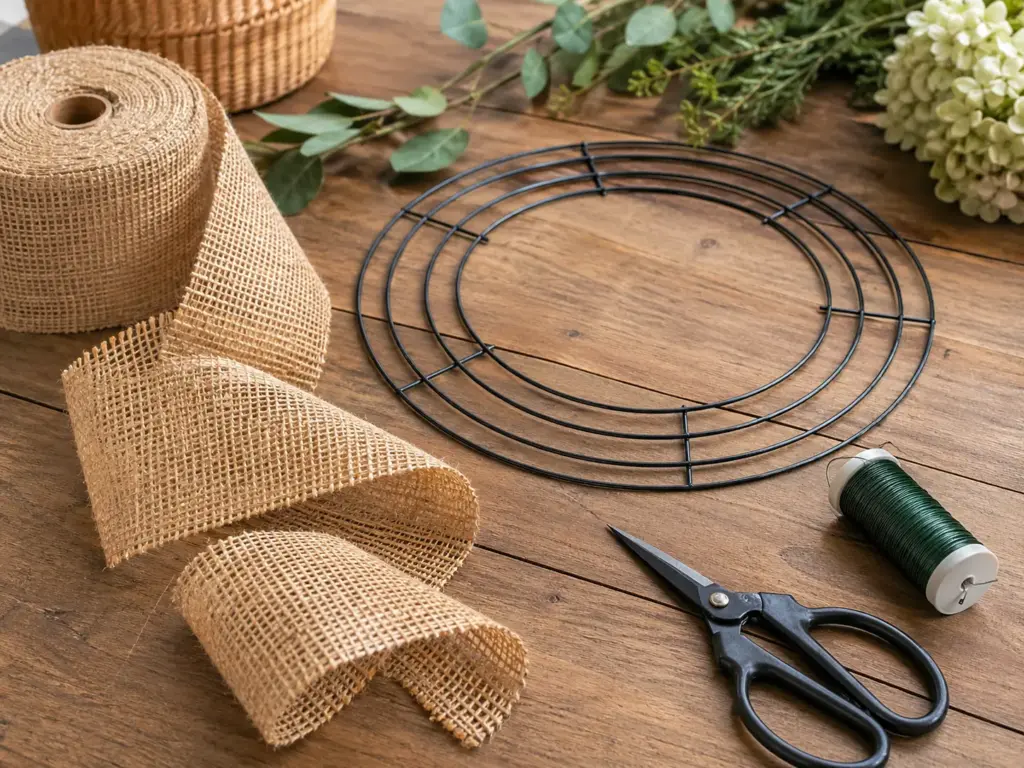
What You'll Need Before You Start
Gather these supplies before you begin. Having everything within reach makes the process smoother once you're working with the burlap.
- Wire wreath form — 12", 16", or 18" (three-ring style works best)
- Burlap fabric or burlap ribbon — see the yardage guide below
- Floral wire or zip ties — for anchoring the burlap to the frame
- Scissors — sharp fabric scissors cut cleanly and reduce fraying
- Hot glue gun — for embellishments only; not needed for the burlap itself
- Optional: ribbon, floral picks, faux florals, a bow, or a monogram letter for decorating
How Much Burlap Do You Actually Need?
Most tutorials skip this, which is why so many first-time wreath makers run out of fabric halfway through. The amount you need depends on two things: the size of your wire form and how full you want the finished wreath to look.
Use the table below as a starting point. These figures are based on a standard 5"–6" wide burlap ribbon or strips cut to that width, with loops pulled to about 3" deep.
| Wreath Form Size | Burlap Width | Approx. Yardage Needed |
|---|---|---|
| 12" | 5"–6" wide | 10–12 yards |
| 16" | 5"–6" wide | 15–18 yards |
| 18" | 5"–6" wide | 18–22 yards |
Burlap ribbon vs cutting from bolt fabric: Burlap ribbon comes with finished edges, which helps keep fraying under control as you work. If you're cutting strips from burlap fabric by the yard, aim for a consistent width and consider running a thin bead of fabric glue or a quick serge along each long edge before you start. Either approach works — the bolt fabric option tends to be more cost-effective when you're making multiple wreaths.
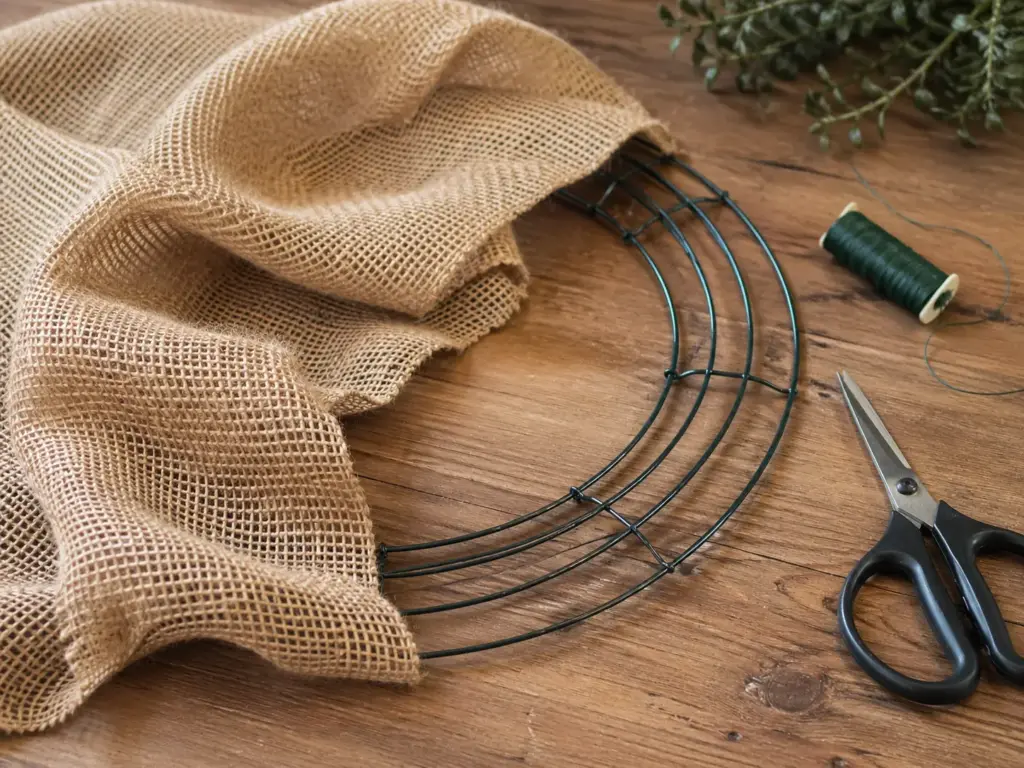
Step 1 — Anchor Your Burlap to the Wreath Form
Start by securing the end of your burlap to the innermost ring of the wire form. Fold the first 4–5" of burlap back on itself to create a small, doubled-up section, then attach it with a piece of floral wire or a zip tie, pulling tight so it doesn't shift.
Leave a short tail (about 2") tucked behind the frame. You'll tuck the finishing end here too, so starting neatly makes the back of the wreath cleaner.
One practical note: anchor your starting point next to one of the vertical cross-bars on the frame. This gives you a stable reference point and makes it easier to keep your loop spacing consistent as you work your way around.
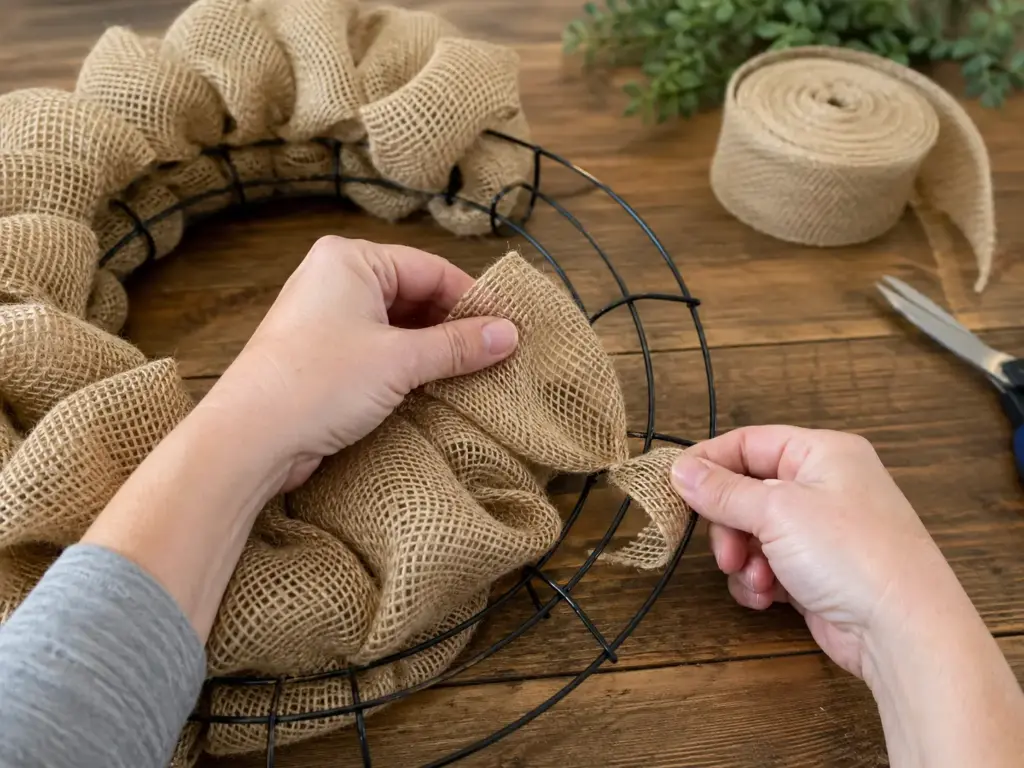
Step 2 — Create the Loops
This is the core technique, and once you get the rhythm it moves quickly. Each section of the wire form — the space between two vertical cross-bars — holds 2 to 3 rows of loops.
Here's how to make one row of loops:
- Fold the burlap under the inner edge of the frame.
- Pull a loop up through the first (innermost) opening — aim for about 3" of loop above the frame.
- Move to the middle opening and pull a second loop through.
- Pull a third loop through the outermost opening.
- Fold the working end of the burlap back under the frame to start the next row.
Repeat this three-loop sequence all the way around the frame. The size of each loop controls how puffy the finished wreath looks — 3" is a reliable starting point, but you can go slightly larger if you want more volume.
Try to keep loop sizes consistent within each section. Uneven loops tend to show more on smaller wreaths; on an 18" form they're less noticeable.
Step 3 — Work Your Way Around the Form
Keep adding rows of loops — working in the same direction — until the entire form is covered. Push each new row of loops firmly against the previous one as you go. This keeps the wreath dense and prevents gaps from opening up once you fluff everything out.
If you run out of burlap mid-way, just anchor a new length the same way you anchored the first piece: fold the end over and secure with floral wire close to a cross-bar. The join will be hidden by the surrounding loops.
Use roughly the same amount of fabric in each section between cross-bars. If one section uses noticeably more than the others, the finished wreath can look slightly lopsided from the front.
Step 4 — Secure the End and Fluff
When you've worked all the way around and the form is covered, cut the burlap leaving a few extra inches, then fold and tuck the end behind the adjacent loops or anchor it with floral wire. The loops around it will hold it in place.
Now fluff. Reach in and open each loop slightly, pulling the edges upward and outward. This is what transforms a flat-looking wreath into a full, three-dimensional one. Take your time here — five minutes of fluffing makes a visible difference.
Common issue to avoid: If you can see the wire form through the front of the wreath after fluffing, the loops are likely too small or spaced too far apart. Add a few extra loops in the bare spots before moving on to decoration.
Step 5 — Decorate for Any Season
The wreath base you've just made is intentionally neutral — natural burlap works with almost any color palette. Here are four seasonal directions to take it:
Fall / Harvest
Tuck faux autumn leaves or small pumpkin picks into the loops without gluing, so you can swap them out later. A burlap or jute bow at the top keeps the rustic feel consistent. Warm tones — burnt orange, deep red, mustard — contrast well against natural burlap.
Holiday / Christmas
Add sprigs of faux pine, red berry picks, or small ornaments secured with floral wire. A wide wired ribbon — plaid or solid red — works well as a bow. If you're using the wreath outdoors, wire picks in rather than gluing to make the wreath easier to store between seasons.
Spring / Summer
Faux florals in soft pinks, whites, or yellows give a lighter feel. You can mix in a few stems of lavender or eucalyptus for texture. A simple satin ribbon bow in a pale color keeps the overall look fresh without competing with the flowers.
Everyday / Minimal
A single wooden or metal monogram letter — attached with floral wire — makes the wreath feel personal without adding visual clutter. A solid-colored ribbon bow in black, white, or navy pairs with nearly any door color.
Tips for a Fuller, Neater Finish

Managing fraying: Some fraying is part of burlap's natural texture and actually adds to the rustic look. If you want cleaner edges — especially when cutting from bolt fabric — run each strip along a serger or apply a thin line of clear fabric glue along the cut edges before you start looping. Let it dry fully before working with the strips.
If the wreath gets wet: Burlap can lose some of its shape when damp and may take on a softer, slightly saggy appearance after rain. For front doors with direct weather exposure, a couple of coats of clear acrylic spray applied to the finished wreath (before decorating) can help it hold its structure longer.
Keeping loops even: Cut a small cardboard strip to your target loop depth — say, 3" — and use it as a quick guide as you pull each loop through the frame. It's a minor step that takes seconds and makes the front of the wreath look noticeably more consistent.
Storing between seasons: Store the burlap base flat in a dry place, ideally in a large zip bag or wrapped in tissue paper. Remove any glued embellishments before storing; wired picks can usually stay in place.
From Our Experience
Customers who work with burlap fabric for wreath-making consistently find that the most common frustration is running short on fabric mid-project. Buying slightly more than your estimate — one extra roll or an extra half-yard — tends to be worth it. Leftover burlap works well for table runners, bow-making, or small accent projects, so it rarely goes to waste.
For buyers working on multiple wreaths at once — gifts, school events, or seasonal batches — ordering burlap fabric by the yard from a bolt is usually more economical than buying individual ribbon rolls. The weave structure is the same; the main trade-off is spending a few extra minutes cutting strips to the desired width. A rotary cutter and cutting mat make that step much faster.
Burlap is a woven natural fiber — primarily jute — which gives it its characteristic coarse texture and open weave. Understanding the fiber helps set realistic expectations: it won't soften dramatically with washing, and some fraying at cut edges is normal behavior rather than a quality issue.
Frequently Asked Questions
Can I use burlap fabric instead of burlap ribbon?
Yes. Cutting burlap fabric into 5"–6" wide strips gives you the same result as using pre-made ribbon. The main difference is that ribbon comes with finished edges, while fabric cut from the bolt will fray along the long sides. See the tip on managing fraying above, or browse burlap fabric by the yard to find the width and color that works for your project.
How do I keep burlap from fraying on a wreath?
For cut edges, a thin line of clear fabric glue or a pass through a serger along each long edge will reduce fraying. For the shortcut ends — the start and finish of your burlap length — tucking them firmly behind the frame is usually enough, since those edges are hidden. Some fraying at the loop edges is expected and considered part of the look.
Can a burlap wreath be used outdoors?
Burlap can handle brief moisture exposure, but extended rain or direct sun tends to affect its shape and color over time. For outdoor use, a few coats of clear acrylic spray on the finished wreath base (before adding embellishments) adds some resistance. Covered porches or sheltered doorways are a better long-term environment than fully exposed spots.
How long does a burlap wreath last?
A wreath stored properly between seasons can last several years. The burlap base itself holds up well; embellishments — especially faux florals — tend to fade or become brittle before the burlap does. Replacing the decorative elements while keeping the same base is a practical way to refresh the look each season without starting over.
What size wire wreath form should I use?
An 18" form is the most common choice for front doors — it's large enough to be visible but fits most standard door widths. A 12" form works well for interior walls, windows, or as a smaller accent piece. A 16" form splits the difference if you want something slightly more compact than 18" but fuller than 12".
A burlap wreath is one of those projects that looks more involved than it is. Once you've made the first one, the technique is easy to repeat — and easy to adapt for different seasons by changing out the embellishments rather than rebuilding from scratch. If you're ready to get started, browse our burlap fabric collection to find the right width, weight, and color for your project — or explore our full range of craft fabric options for other DIY ideas.


 Login with Google