

How to Sew with Linen Fabric: Cutting, Stitching and Finishing Tips for Beginners

Sewing with linen is straightforward once you understand its key quirks: it frays readily, wrinkles under the iron, and shifts on the cutting table if you skip the prep steps. Pre-wash your fabric, use sharp tools, and finish every raw edge — do those three things and linen will reward you with clean, professional-looking seams and garments that last for years. This guide walks beginners through every stage, from laying out the fabric to pressing the final hem.
Why Linen Behaves Differently from Other Fabrics
Linen fabric is woven from flax fibres, which gives it a firm, slightly textured hand and a natural tendency to fray along cut edges. Unlike knit fabrics that stretch and recover, linen is a stable woven with very little give — which is great for structure but means it needs careful handling at every stage.
Two properties catch beginners off guard:
- Shrinkage: Linen can shrink 3–5% in the first wash. Always pre-wash and dry your fabric before cutting to avoid a finished garment that no longer fits.
- Fraying: The loose plain or hemi-stitch weave means cut edges unravel quickly. Plan to finish seams within a session of cutting, and handle pieces by their centres rather than their edges.
Understanding these two traits upfront will save you from the most common beginner mistakes and make every subsequent step feel intuitive.
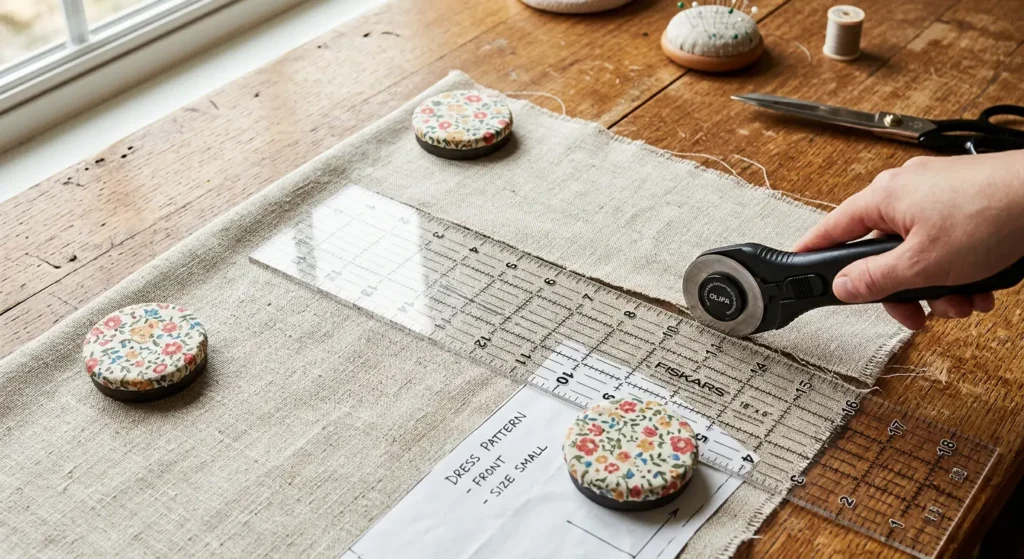
Cutting Linen Accurately: Prep and Layout
Accurate cutting starts well before the rotary cutter or scissors come out. Follow this sequence for clean, straight pieces every time.
Pre-wash and press first
Machine wash on a warm cycle (40°C) and tumble dry or line dry, then press with a hot steam iron while the fabric is still slightly damp. This pre-shrinks the cloth and relaxes the weave, so your pattern pieces sit flat.
Grain line matters more than you think
Linen has a clear warp and weft. Cut even slightly off-grain and the finished garment will twist or hang unevenly. Fold the fabric selvedge to selvedge on a flat cutting table, align your pattern pieces precisely with the grain line arrow, and pin generously — at least every 8–10 cm — to stop the layers shifting.
Use sharp tools
A dull rotary blade or scissors drags the fibres and creates ragged edges that fray even faster. Replace rotary blades after every 2–3 metres of linen. Pattern weights placed on top of pieces (rather than pins alone) also reduce distortion when cutting curved edges.
For instance, a home sewer making a linen button-front shirt found that switching from scissors to a fresh rotary blade reduced her fraying by half and cut her finishing time significantly.
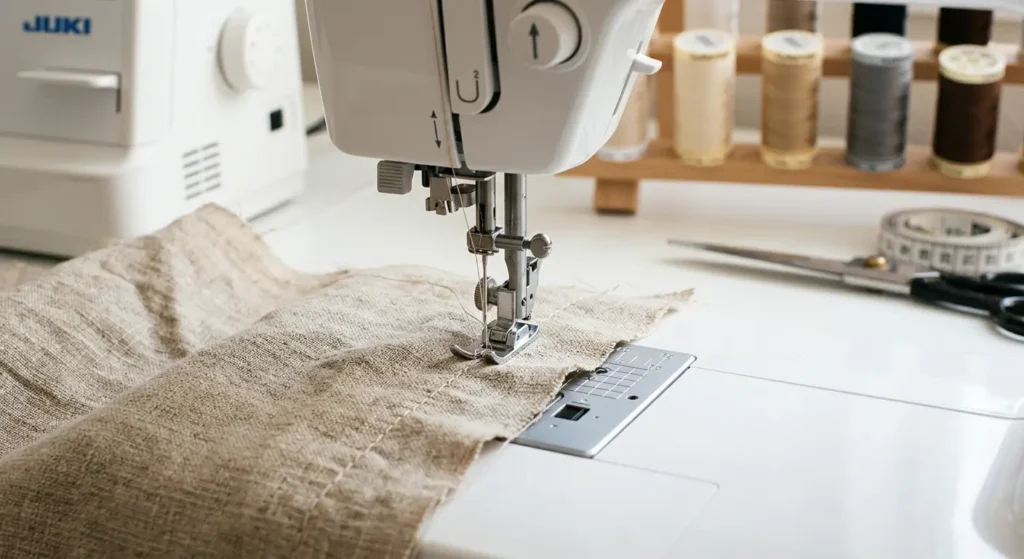
Stitching Linen: Needle, Thread and Tension Settings
Linen's firm weave responds best to a medium-length straight stitch and a needle sized to match the fabric weight.
Needle and thread choices
- Needle: Use a universal or sharp needle in size 80/12 for lightweight linen and 90/14 for medium to heavier weights. A sharp needle pierces the fibres cleanly rather than pushing them aside, which reduces puckering.
- Thread: 100% cotton or a cotton-polyester blend in a weight that matches your fabric. Avoid heavy topstitching thread for seams — it can cause the fabric to gather.
Stitch length and tension
Set your stitch length to 2.5–3 mm. Too short and you risk perforating the fabric along the seam line; too long and the seam lacks strength. Test tension on a scrap first — linen can cause slight puckering if the upper tension is too tight. Reduce upper tension by half a step if you see rippling along the seam.
Handling bulk at seam intersections
Linen seam allowances stack up quickly at corners and intersections. Press each seam open as you go rather than waiting until the end — this keeps bulk manageable and gives you a flatter finish.
Finishing Raw Edges So They Don't Fray
Finishing linen edges is non-negotiable — unfinished seams will unravel in the wash within a few cycles. The good news is that several quick methods work well, even for beginners.
Serger or overlocker
The fastest and most durable option. A three- or four-thread overlock stitch trims and encases the edge in one pass. If you sew linen regularly, this alone justifies owning a serger.
Zigzag stitch
Set your machine to a medium-width zigzag (width 3, length 2) and stitch along each raw edge before assembling the seam. It's not as neat as a serger finish but is completely effective and available on every basic sewing machine.
French seams
For lightweight linen garments like summer blouses or linen summer dresses, French seams enclose both raw edges inside the seam itself — no separate finishing step needed. Sew wrong sides together at 6 mm, trim to 3 mm, press, fold right sides together, and stitch at 1 cm.
Flat-felled seams
Ideal for structured pieces like trousers or jackets where you want a strong, visible seam on the outside. More time-consuming but extremely durable and gives a tailored, ready-to-wear look.
If you enjoy working with natural wovens, you may also find the finishing techniques in our guide on choosing the right fabric for digital sewing patterns useful when planning your next project.
Pressing and Hemming: The Final Steps That Make the Difference
Linen is one of the most iron-responsive fabrics you will ever work with — a good press can transform a home-sewn garment into something that looks professionally made.
Pressing tips
- Use a hot steam iron (linen setting or cotton setting) and press on the wrong side to avoid shine.
- Press seams open as you sew, not all at once at the end — this is the single biggest quality upgrade for beginners.
- A damp pressing cloth placed over the right side lets you press from the front without scorching or flattening the texture.
Hemming linen
Linen holds a pressed hem beautifully. For a clean finish, press up 1 cm, then press up again by the desired hem depth. A slip stitch by hand gives the most invisible result; a straight machine stitch 2–3 mm from the folded edge is faster and perfectly acceptable for casual garments.
For a relaxed, slightly raw aesthetic — popular in contemporary linen shirts and wide-leg trousers — a single-turn hem left deliberately unfinished can work, but only if the fabric has been pre-washed and the edge serged first to control fraying.
Start sewing linen today
Linen rewards careful prep and simple technique. Pre-wash, cut on grain, finish every edge, and press as you go — those four habits will carry you through any linen project with confidence. Browse the full range of linen fabrics by the yard at Global Fabric Wholesale, with no minimum order and worldwide shipping, or explore the wider fabric shop if you want to compare linen alongside cotton and other natural wovens for your next make.


 Login with Google